Beam Line Detectors Shift
Contents
Active Collimator
Control and DAQ
The Active Collimator screens are here:
Monticello -> BPM (1st blue button) -> Hall D Active Collimator Diagnostics
The preamp gains, 1Hz data and averaging/digital gain are on that screen. Go to the Raw Wire Data button for the individual plots and Time Domain Graph HDACI/O for positions.
High Speed ROOT File Writer
An EPICS IOC server is set up on gluon29.jlab.org:26064 to write the raw waveform data to /gluonraid1/Users/ac directory on demand.
The control of this High Speed DAQ can be found in Hall-D's EPICS GUI:
- Open Hall-D CSS EPICS Control if not already available following instructions
- From Main Action Bar, open Active Collimator GUI.
- Start or Stop the High Speed ROOT File by clicking the button underneath the title.
- Once started, make sure the a new ROOT file is created and the File Size is increasing.
In very rare occasions, e.g. some one rebooted the AC DAQ server, the writer IOC needs to be restarted
- Reboot using command lines
- Log onto gluon29 using hdsys account
-
telnet localhost 26064 - Restart the IOC by keyboard combination Ctrl+X
- Exit the IOC proServer by keyboard combination Ctrl+]
- Exit the telnet by typing
quit
Raw Data Analyzer
- From Active Collimator GUI
- Click the Analyzer button in the PXI Fast DAQ section.
- From a Linux terminal
- log onto a gluon machine, e.g. gluon30.jlab.org, using account hdops:
ssh -X hdops@gluon30 - enter acanalyzer directory:
cd ~\acanalyzer - start the analyzer script:
./run - in the analyzer, open a collection of raw data files or a processed ROOT file and start the analysis.
List of EPICS PVs
Collimator
Move Collimator
- Open Hall-D CSS EPICS Control if not already available following instructions.
- From Main Action Bar, click Motors in BEAM section.
- Click Collimator to bring up the Collimator Control GUI.
- Click the button corresponding to the desired location to move the collimator. Wait until the Motor is Done.
- If the communication to the motor is broken, e.g. pink fields showing, refer to instructions to reboot the IOC.
- Make a log entry to HDLOG.
Halo Counters
Beam Profilers
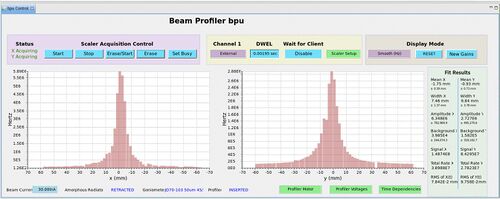
There are two beam profilers installed in the beam line to measure beam profiles in front of the active collimator and right before the photon beam dump. Each profiler has two planes scintillator fibers to give X-Y 2D information. Each plane consists of 64 fibers of 2 mm width and they are readout by eight Multi-anode PMTs.
Open Beam Profiler GUI
- Open Hall-D CSS EPICS Control if not already available following instructions.
- From Main Action Bar, click Beam Profilers in BEAM section.
Check Scaler Rates
- Open the Upstream Profiler or the Downstream Profiler to check the rates.
- In the GUI, one will see the scaler counts plotted as a function of X and Y axises. The updating frequency is controlled by the DWEL parameter. The update interval is
DWEL×256. - There are three modes of data presentation and we are currently using two of them: Raw and Accumulative.
- The Raw mode update the plot with the new counts coming from the most recent interval.
- The Accumulative mode keeps the sum of all hits until the Reset button is pressed.
Adjust BP Voltages
The power used by the Beam Profilers includes both High Voltages and Low Voltages. The HVs are used to power the MaPMTs while the LVs are used to power the pre-amplifiers.
- High Voltage
- Each MaPMT is powered by its own HV channel. Therefore there are eight channels for each plane. These HVs can be adjusted through HV X/Y → PVU/D: Show X/Y HV Channels. As the threshold for the discriminator is embeded in hardware, adjusting the HV is the way to effectively change the threshold.
- Low Voltage
- Readouts from the same plane share two groups of Low Voltages. Each group needs two 5-V and one 1-V inputs. Always make sure that they are ON. No adjustment is allowed.
