Difference between revisions of "Start Counter Commissioning"
From Hall D Ops Wiki
(Created page with "* To operate the Start Counter (ST) for the commissioning run you must begin by selecting the '''ST Expert Voltages''' button located in the main action bar in the CSS worksp...") |
|||
| Line 1: | Line 1: | ||
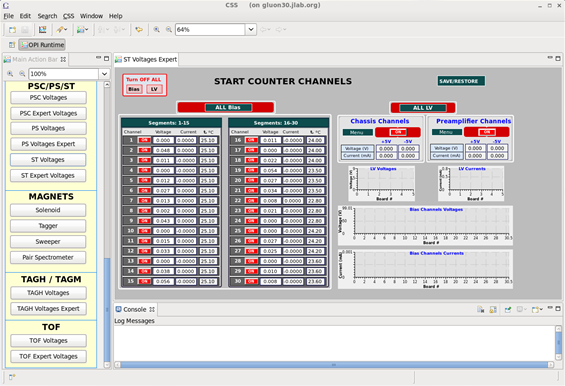
* To operate the Start Counter (ST) for the commissioning run you must begin by selecting the '''ST Expert Voltages''' button located in the main action bar in the CSS workspace. | * To operate the Start Counter (ST) for the commissioning run you must begin by selecting the '''ST Expert Voltages''' button located in the main action bar in the CSS workspace. | ||
* The ST will be powered off and the expert voltages GUI will look something like the following: | * The ST will be powered off and the expert voltages GUI will look something like the following: | ||
| − | + | [[File:ST_Expert_Voltages_Off.png]] | |
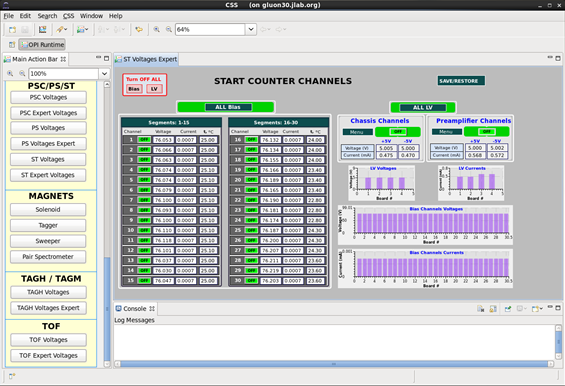
:* The ST expert voltages GUI is more useful than the voltages GUI. The expert GUI allows the user to view all of the thermocouple readings of each individual ST channel. Furthermore, it allows the user to view the bias being supplied to each of the channels as well as the current that is being drawn for each channel. | :* The ST expert voltages GUI is more useful than the voltages GUI. The expert GUI allows the user to view all of the thermocouple readings of each individual ST channel. Furthermore, it allows the user to view the bias being supplied to each of the channels as well as the current that is being drawn for each channel. | ||
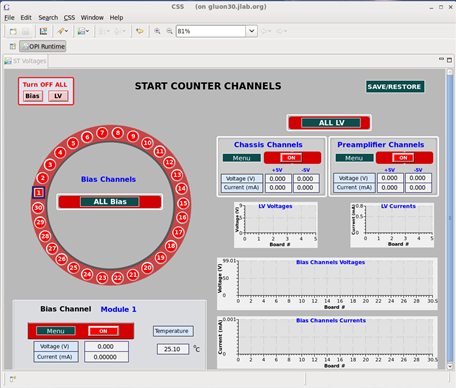
:* The alternative '''ST Voltages''' display will look like the following: | :* The alternative '''ST Voltages''' display will look like the following: | ||
| − | + | [[File:ST_Voltages_Off.png]] | |
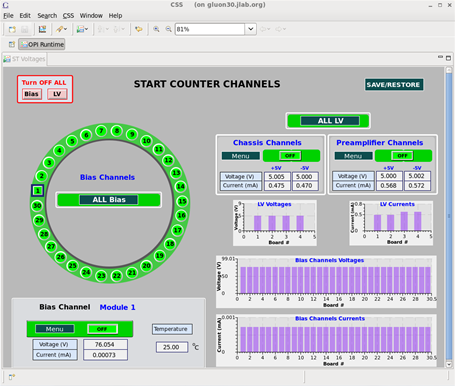
::* The ST voltages GUI is useful in the sense that the user may view the orientations of the ST channels as they are oriented on the actual detector. This view is looking downstream, i.e. the beam is hitting you in the back of the head. | ::* The ST voltages GUI is useful in the sense that the user may view the orientations of the ST channels as they are oriented on the actual detector. This view is looking downstream, i.e. the beam is hitting you in the back of the head. | ||
:* From either GUI you will be able to control the LV and Bias power distributions to the Start Counter. | :* From either GUI you will be able to control the LV and Bias power distributions to the Start Counter. | ||
| Line 11: | Line 11: | ||
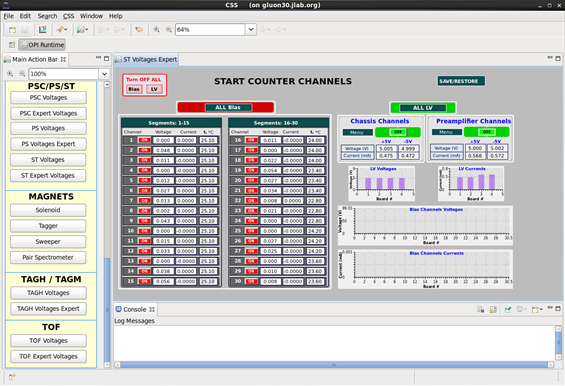
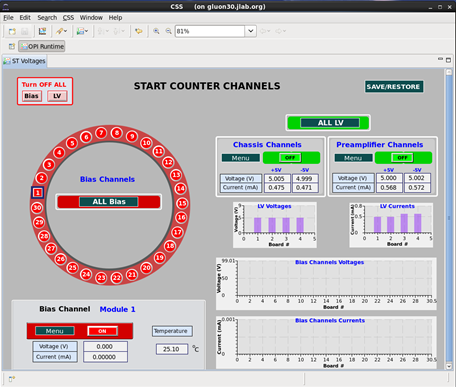
:* Turn on the LV power system (pre-amplifier channels & chassis channels). Once the LV monitoring displays are green you may proceed. | :* Turn on the LV power system (pre-amplifier channels & chassis channels). Once the LV monitoring displays are green you may proceed. | ||
::* The expert display will look like the following when the LV has been turned on: | ::* The expert display will look like the following when the LV has been turned on: | ||
| − | + | [[File:ST_Expert_Voltages_LV_On.png]] | |
::* The control display will look like the following when the LV has been turned on: | ::* The control display will look like the following when the LV has been turned on: | ||
| − | + | [[File:ST_Voltages_LV_On.png]] | |
* Once the LV power has been ramped up you may Turn on the Bias power system. Once all the channel monitoring buttons are displayed green the Start Counter is fully powered and now fully operational. | * Once the LV power has been ramped up you may Turn on the Bias power system. Once all the channel monitoring buttons are displayed green the Start Counter is fully powered and now fully operational. | ||
:* The expert voltages GUI will resemble the following: | :* The expert voltages GUI will resemble the following: | ||
| − | + | [[File:ST_Expert_Voltages_Bias_On.png]] | |
:* The voltages GUI will resemble the following: | :* The voltages GUI will resemble the following: | ||
| − | + | [[File:ST_Voltages_Bias_On.png]] | |
* To turn off the Start Counter you must follow these steps '''IN THIS EXACT ORDER''': | * To turn off the Start Counter you must follow these steps '''IN THIS EXACT ORDER''': | ||
:* First, ramp down the bias power system. Once all the channel monitoring buttons are displayed red and no bias is being supplied to the ST1s you may proceed. The GUI should resemble that of the third and fourth images in this wiki. | :* First, ramp down the bias power system. Once all the channel monitoring buttons are displayed red and no bias is being supplied to the ST1s you may proceed. The GUI should resemble that of the third and fourth images in this wiki. | ||
:* Second, ramp down the LV power systems. One the LV monitoring buttons are displayed red the Start Counter is powered off. The GUI should now resemble that of the first and second images presented in this wiki. | :* Second, ramp down the LV power systems. One the LV monitoring buttons are displayed red the Start Counter is powered off. The GUI should now resemble that of the first and second images presented in this wiki. | ||
Revision as of 12:10, 24 October 2014
- To operate the Start Counter (ST) for the commissioning run you must begin by selecting the ST Expert Voltages button located in the main action bar in the CSS workspace.
- The ST will be powered off and the expert voltages GUI will look something like the following:
- The ST expert voltages GUI is more useful than the voltages GUI. The expert GUI allows the user to view all of the thermocouple readings of each individual ST channel. Furthermore, it allows the user to view the bias being supplied to each of the channels as well as the current that is being drawn for each channel.
- The alternative ST Voltages display will look like the following:
- The ST voltages GUI is useful in the sense that the user may view the orientations of the ST channels as they are oriented on the actual detector. This view is looking downstream, i.e. the beam is hitting you in the back of the head.
- From either GUI you will be able to control the LV and Bias power distributions to the Start Counter.
- You will also be able to adjust the ST LV and Bias parameters. However, these values have already been configured so it is imperative that YOU DO NOT MODIFY ANY PARAMETERS without consulting a Start Counter expert first!!!
- In order to properly supply LV and Bias to the Start Counter you must follow these steps IN THIS EXACT ORDER:
- Turn on the LV power system (pre-amplifier channels & chassis channels). Once the LV monitoring displays are green you may proceed.
- The expert display will look like the following when the LV has been turned on:
- The control display will look like the following when the LV has been turned on:
- Once the LV power has been ramped up you may Turn on the Bias power system. Once all the channel monitoring buttons are displayed green the Start Counter is fully powered and now fully operational.
- The expert voltages GUI will resemble the following:
- The voltages GUI will resemble the following:
- To turn off the Start Counter you must follow these steps IN THIS EXACT ORDER:
- First, ramp down the bias power system. Once all the channel monitoring buttons are displayed red and no bias is being supplied to the ST1s you may proceed. The GUI should resemble that of the third and fourth images in this wiki.
- Second, ramp down the LV power systems. One the LV monitoring buttons are displayed red the Start Counter is powered off. The GUI should now resemble that of the first and second images presented in this wiki.
